Monitoring Footage in Adobe Premiere Pro CS6
Note: This excerpt is from the forthcoming book Adobe Premiere Pro CS6 Classroom in a Book, ISBN 978-0-321-82247-5.
The greater part of video editing is invested in watching clips and making creative choices about them. It’s important to feel really comfortable browsing media.
Premiere Pro has multiple ways of performing common tasks such as playing video clips. You can use the keyboard, click buttons with your mouse, or use an external device like a jog/shuttle control.
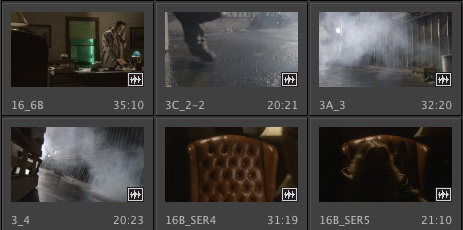
Premiere Pro CS6 has a new browsing feature called hover scrub that allows you to view the contents of your clips quickly and easily right in the bin.
1 Double-click the Double Identity bin to open it.
2 Click the Icon View button at the bottom-left corner of the bin.
3 Drag your mouse, without clicking, across any of the images in the bin.
Premiere Pro displays the contents of the clip as you drag. The left edge of the thumbnail represents the beginning of the clip, and the right edge represents the end. In this way, the width of the thumbnail represents the whole clip.
4 Select a clip by clicking it once. Hover scrubbing is now turned off, and a mini scrollbar appears at the bottom of the thumbnail. Try dragging through the clip using the scrollbar.
Premiere Pro uses the J, K, and L keys on your keyboard to perform playback too, just like the Media Browser:
• J: Play backward
• K: Pause
• L: Play forward
5 Select a clip, and use the JKL keys to play the thumbnail. Be sure to click the clip only once. If you double-click, it will open in the Source monitor.
TipIf you press the J or L key multiple times, Premiere Pro will play the video clips at multiple speeds.
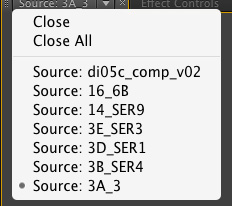
When you double-click a clip, not only is it displayed in the Source monitor, it’s also added to a list of recent clips.
6 Double-click to open four or five clips from the Double Identity bin.
7 Click the Recent Items menu to browse between your recent clips.
TipNotice that you have the option to close a single clip or close all clips, clearing the menu and the monitor. Some editors like to clear the menu and then open several clips that are part of a scene by selecting them all in the bin and dragging them into the Source monitor together. They can then use the recent items menu to browse only the clips from this short list.
8 Click the Zoom menu at the bottom of the Source monitor. By default, this is set to Fit, which means Premiere Pro will display the whole frame, regardless of the original size. Change the setting to 100%.
These Double Identity clips are high-resolution, and they are probably much bigger than your Source monitor. You are likely to have scrollbars at the bottom and on the right of your Source monitor now, so you can view different parts of the image.
The benefit of viewing with Zoom set to 100% is that you see every pixel of the original video, which is useful for checking the quality.
9 Set the Zoom back to Fit.
Playback resolution
If you have an older or slower processor, your computer may struggle to play back very high-quality video clips. To work with a wide variety of computer hardware configurations, from powerful desktop workstations to lightweight portable laptops, Premiere Pro can lower the playback resolution to make playback smoother. You can switch the playback resolution as often as you like, using the Select Playback Resolution menu on the Source (and Program) monitor.
Timecode information
At the bottom left of the Source monitor, a timecode display shows the current position of the playhead in hours, minutes, seconds, and frames (00:00:00;00).
At the bottom right of the Source monitor, a timecode display shows the total selected duration for your clip. Later, you’ll be adding special marks to make a partial selection. For now, it shows the complete duration.
Safe margins
Old-style CRT monitors crop the edges of the picture to achieve a clean edge. If you are producing video for a CRT monitor, click the Settings (spanner icon) button at the bottom of the Source monitor and choose Safe Margins. Premiere Pro displays white outlines over the image.
The outer box is the Safe Action zone. Aim to keep important action inside this box so that when the picture is displayed, cropping does not hide what is going on.
The inner box is the Title Safe zone. Keep titles and graphics inside this box so that even on a badly calibrated display, your audience will be able to read the words.
Click back into the Settings button at the bottom of the Source monitor and choose Safe Margins to turn them off.
Essential playback controls
Let’s look at the playback controls.
1 Double-click the shot 16_6B in the Double Identity bin to open it in the Source monitor.
2 At the bottom of the Source monitor, there’s a yellow playhead marker. Drag it along the bottom of the panel to view different parts of the clip. You can also click wherever you want the playhead to go, and it will jump to wherever you click.
3 Below the clip navigation bar and the playhead, there is a scrollbar that doubles as a Zoom control. Drag one end of the scrollbar to zoom in on the clip navigator.
4 Click the Play button to play the clip. Click it again to stop playback. You can also use the spacebar to play and stop playback.
5 Click the Step Back and Step Forward buttons to move through the clip one frame at a time. You can also use the left- and right-arrow keys on your keyboard.
6 Use the J, K, and L keys to play your clip.
Customizing the monitors
To customize your monitors, click the Settings button
on the Source monitor.This menu gives you several different display options for your Source monitor (the Program monitor has a similar menu). You can choose to view waveforms and vector scopes to analyze your video.
For now, we just want to know how to get regular video on-screen. Make sure Composite Video is selected in this menu.
You can add or remove buttons at the bottom of the Source monitor.
1 Click the Button Editor button at the bottom right of the Source monitor.
A special set of buttons appears.
2 Drag the Loop button
from the floating panel to the right of the Play button on the Source monitor, and click OK.3 Double-click the di05c_compv_02 clip in the Double Identity bin to open it in the Source monitor.
4 Click the Loop button to enable it, and then play the video using the spacebar or the Play button on the Source monitor. Stop the playback when you have seen enough.
With Loop turned on, Premiere Pro continuously repeats playback.
Note: This lesson continues in the forthcoming book Adobe Premiere Pro CS6 Classroom in a Book, ISBN 978-0-321-82247-5


