Keying and Compositing Green Screen Footage in Adobe Premiere Pro CS6
Note: This excerpt is from the forthcoming book Adobe Creative Suite CS6 Production Premium Classroom in a Book, ISBN 978-0-321-83268-9.
The typical workflow for Chroma Keying starts by recording the subject in front of an evenly-lit green or blue background. Once the footage has been imported into Premiere Pro, the background is removed with a chroma key effect (and sometimes a garbage matte), which enables the compositing of the subject with another shot or scene. This technique is used on everything from major motion pictures to the weather report on your local TV news.
How easy, or difficult it is to pull a “clean key” (essential to achieving a convincing final result) depends on a variety of factors having to do with the quality of the footage. Was the background evenly lit? Was it recorded in a video format optimal for Chroma Keying? Does the subject have strands of long hair, or is the subject moving very quickly through the shot? These and other factors will determine whether you can achieve a satisfactory result with a single click, or if you will need to make some adjustments to get the look you want.
Creating the garbage matte
In some green screen footage, there are objects in the shot that can be removed by simply cropping out that part of the frame. The technical term for this is a garbage matte.
1 In the Project panel, select the Chroma Keying bin.
2 Double-click the Chroma Keying sequence to open it in the Timeline panel.
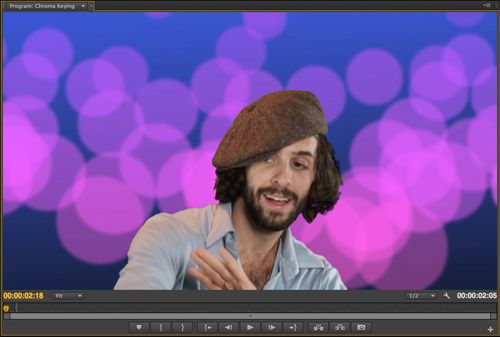
Notice that this sequence contains 2 video layers. On Video 2 is the footage of Joey dancing in front of a green screen, and on Video 1 is a clip of an animated background.
3 Press the spacebar to play the sequence.
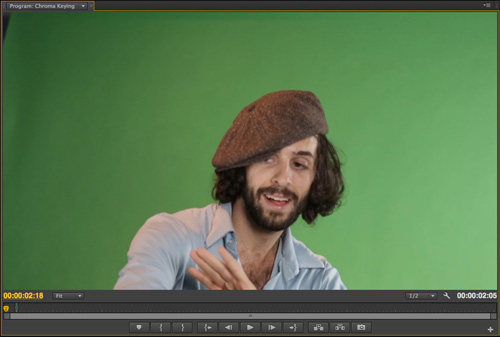
Notice that at the end of the shot, the camera pans left and we see the corner of the wall behind the green screen. You will remove this extraneous object from the shot by creating a garbage matte.
4 Press Shift+7 to make the Effects panel active.
5 Type crop in the Rapid Find box to quickly locate the Crop effect.
6 Select the clip on the Video 2 track in the Timeline, and then double-click the Crop effect to apply it.
7 Press Shift+5 to open the Effect Controls panel.
8 In the Effect Controls panel, click on the Crop effect to select it.
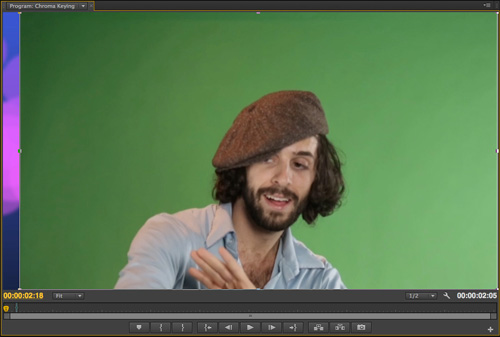
Notice that in the Program Monitor, you can now see a bounding box around the video frame, with handles on the top, bottom, left, and right.
9 In the Timeline, scrub the Current Time Indicator to 02:18, where the wall behind the screen is most visible in the frame
10 In the Program Monitor, drag the left handle of the bounding box to the right, until the wall in the upper-left corner of the frame is no longer visible
11 In the Effect Controls panel, click in the empty space below the Crop effect to deselect it.
Applying the Ultra Key
The Ultra Key is a powerful Chroma Key effect that makes it easy to pull a “clean key” from footage shot with a green screen background. You’ll first define the background color, then you will make some minor adjustments that will make Joey appear as if he is part of the background on the Video 1 layer in the Timeline.
1 Press Shift+7 to make the Effects panel active.
2 Type ultra in the Rapid Find box to quickly locate the Ultra Key effect.
3 Double-click the Ultra Key effect to apply it
4 In the Effect Controls panel, locate the Ultra Key effect (it will be on the bottom of the stack) and click on the Eyedropper to activate it
Look at the shot in the Program Monitor and note that the green screen was not lit evenly. The background is lighter on the right side of the frame, and gradually gets darker towards the left side of the frame. This is a common scenario that editors have to deal with.
The best approach in this situation is to select a shade of green in the frame that is about halfway between the darkest and lightest areas of the green background
5 In the Program Monitor, click on a green value that’s halfway between the lightest and darkest areas of green in the frame. In this case, it would be just to the left of Joey’s face.
The green background has now disappeared from the frame, and you can now see the background clip on Video 1 showing through. However, it’s not a “clean key” yet as you can still see some darkness in the background to the left, where the green screen was lit darker. Making some minor adjustments will fix this.
6 In the Effect Controls panel, locate the Ultra Key effect and change the setting on the Output pop-up menu from Composite to Alpha Channel.
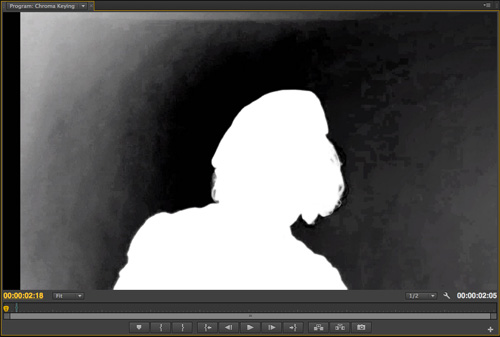
In the Program Monitor, you can now see the alpha channel, or transparency information, of the clip. The black areas are transparent, while the white areas are opaque.
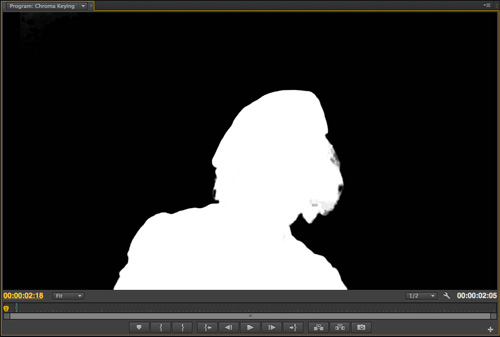
The goal when you are adjusting the controls in the Ultra Key effect is to make the entire background completely black, while keeping the subject completely white (with the exceptions of the edges of the subject which should be halfway between white and black to avoid a “hard edge” on the subject that can make the composite look fake and unconvincing).
7 Click the disclosure triangle next to Matte Generation in the Ultra Key effect to reveal it’s properties.
8 Click on the value for the Pedistal property and drag it to the right, until it’s value is 100. As you drag, notice how the background becomes nearly entirely black, while the subject remains white.
In this case, adjusting the Pedistal property got you 95% of the way there, but you will still notice an area in the upper-left corner of the background that has not turned completely black. You will next adjust the Shadow property to finish the job.
9 Click on the value for Shadow and drag it to the left until it’s value is 25. As you drag, notice how the remaining white pixels in the background fade to black.
10 Click the Output pop-up menu and change the setting from Alpha Channel back to Composite.
11 In the Timeline, drag the Current Time Indicator to the beginning of the sequence, and then press the spacebar to play it back.
Joey is now convincingly composited into the background. Had this clip been shot with an evenly lit green screen, the fine tuning you just did would likely not have been necessary. The reality in the world of film and video production is that editors have to work with green screen footage recorded in a variety of optimal, and not-so-optimal, situations. The good news is that with the Ultra Key effects, it’s usually just a matter of selecting a “middle ground” color when you start the process, then making some minor adjustments like you just did to get the desired result.
Note: This lesson continues in the forthcoming book Adobe Creative Suite CS6 Production Premium Classroom in a Book, ISBN 978-0-321-83268-9
